How can we help you?
Video and Screen Conferencing


HuddleIQ supports both Video and Screen Conferencing using peer-to-peer technology and WebRTC, which is regarded by most as the most secure and fastest conferencing technology available.
Videos may be displayed to the side, allowing you to continue working on the board or expanded into the main view that utilizes all available space.
Starting a video conference begins with clicking this icon, located on the bottom-right toolbar, which opens the “Start a Video Conference” window described below.
Tip: If you can not see this icon, then the toolbar has been collapsed; click the below icon to expand it.
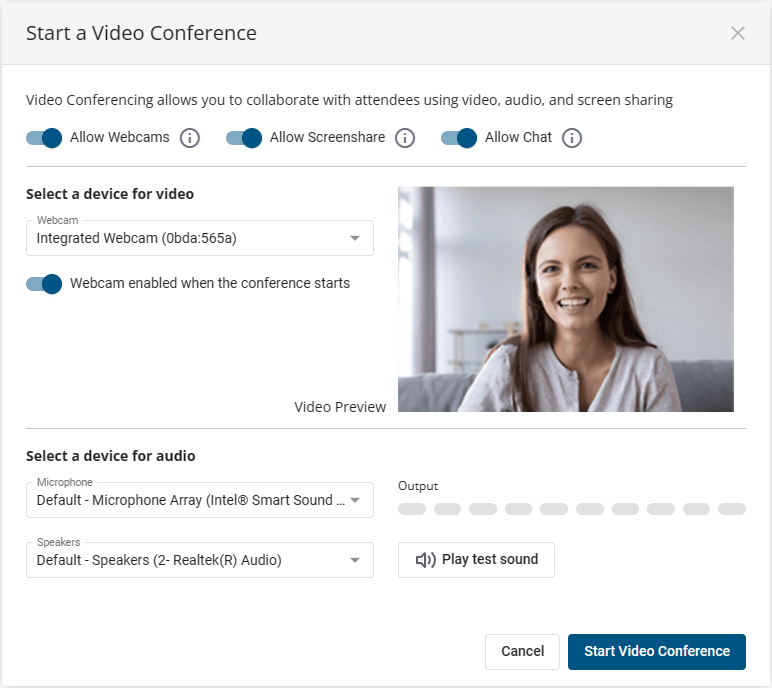
Allow Webcams
Whether attendees of the conference may use their webcams.
Allow Screenshare
Whether attendees of the conference may screen share.
Allow Chat
Whether attendees of the conference may use the chat feature.
Select a device for video
Select the webcam to use for your conference.
Webcam enabled when the conference starts
Determines whether your webcam is on when the conference starts. If not, you can always turn it on using the control bar.
Select a microphone
Select the microphone to use for your conference call, and test the output.
Select speakers
Select the speakers or headphones to use for your conference call.
When you speak into your microphone, the bars on the output level will go green, indicating that your microphone is working correctly.
If you are starting a video conference, others in attendance will be invited to join the video conference, and they will be presented with the same options to configure their video conferencing devices.
If you are joining the video conference, you will be presented with a “Join Video Conference” button instead.
Keep track of time passed in your conference by enabling the task timer from the bottom-right toolbar.
Once you are part of the video conference, you will see this icon when hovering over a video in the side view. Clicking it will move it to the larger main view.
Hovering over a video displays the user’s initials, and hovering over this icon will display their full name.
While in a video conference, this control bar will appear and allows you to configure your video conferencing devices and preferences.
Selecting this option enables you to share your screen with everyone in attendance in one of three ways:
Tip: Enabling “share audio” will allow other attendees to hear audio played from your computer, such as that coming from a YouTube video being played on your board
Enable or disable your video webcam.
Enable or disable your microphone.
Enable or disable your speakers.
Select the feature you’d like to modify:
Opens the video conference settings, which allows you to change and test your devices.
If you joined a video conference, then this will exit you from the call.
If you started the video conference, then this will end the video conference for everyone.
Start a Video Conference: Board Hosts, Board Facilitators, Board Editors
Participate in a Video Conference: Board Hosts, Board Facilitators, Board Editors, Board Commentators, Board Viewers
View a Video Conference: Board Hosts, Board Facilitators, Board Editors, Board Commentators, Board Viewers
Use a Webcam: Board Hosts, Board Facilitators, Board Editors, Board Commentators
Use a Microphone: Board Hosts, Board Facilitators, Board Editors, Board Commentators
Screen Share: Board Hosts, Board Facilitators, Board Editors, Board Commentators
Plan Availability: Free*, Standard, Premium
Notes: Only the member who starts the video conference may end the video conference for everyone.