
Add a Member or Guest
Learn how to add new members or guests to your HuddleIQ organization, including setting licenses, administrator privileges, and profile options.
HuddleIQ administrators can add new members or guests to their organization through the Dashboard, allowing team expansion and collaboration access.
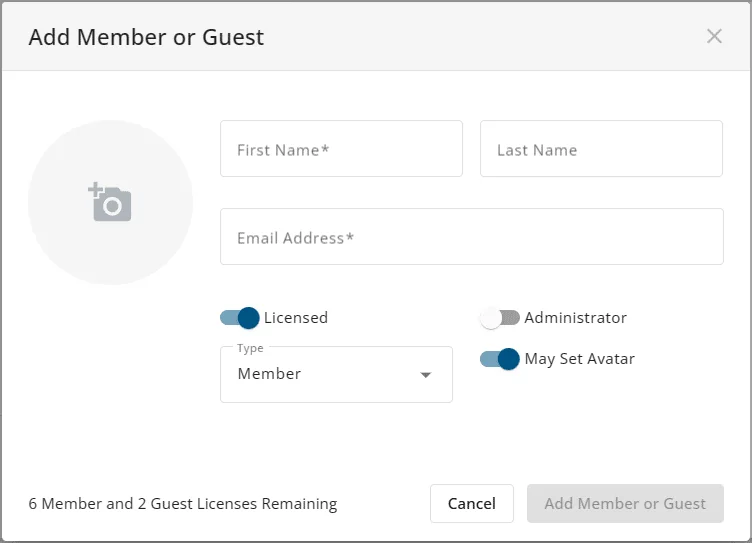
How to Add a Member or Guest
- Navigate to Dashboard > Administration > Members & Guests.
- Enter the required details:
| Field | Required | Description |
|---|---|---|
| First Name | Yes | The member or guest’s first name |
| Last Name | No | The member or guest’s last name |
| Email Address | Yes | Email used for account activation |
| Role Type | Yes | Choose Member or Guest |
- Configure additional options as needed (see below).
- Click Save to send the activation email.
When a new member or guest is added and licensed, they receive an email at the nominated email address to activate their account and set their password.
Add Member or Guest Options

Upload and override the profile image of the member or guest.

| Option | Description |
|---|---|
| Licensed | Determines whether the member or guest may log in and use HuddleIQ. The number of licenses remaining displays in the bottom-left of the window. Note: When you save with Licensed set to “Yes”, HuddleIQ immediately sends an activation email. The same email is sent later if you switch an existing member from “Licensed: No” to “Licensed: Yes”. |
| Administrator | Determines whether the member is an administrator. Note: Only members may be administrators. |
| May Set Avatar | Determines whether the member or guest may alter their profile image. |

Applies To: Administrators
Plan Availability: Free*, Education Free, Standard, Premium